This week's Take5, expands a bit on something I mentioned at the Educator Meetup: getting started. We began planning the Kilmer Library Makerspace a bit over three years ago and these are my top five tips for starting a makerspace. 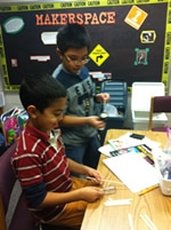 Camelot ES Makerspace Camelot ES Makerspace Visit other spaces Your first step should be to visit other makerspaces. After seeing makerspaces pop up in library literature, my first makerspace adventure was a visit to the Camelot Elementary School Library Makerspace; I consider librarian Valerie Jopeck (now our district's Elementary Library Specialist) one of my makerspace mentors. It was incredibly helpful to see her space and how it was organized and to talk to her about the kinds of lessons she was doing with her students. I learned how she was supporting curriculum, facilitating critical thinking and encouraging creativity. Even though we teach at different levels, a visit to Valerie's space helped me start think about what this could look like at my middle school library. Checking out Nova Labs, a local community makerspace, also helped me begin to envision our program. If you cannot find a makerspace nearby, visit and connect with other makerspaces online. Laura Fleming's 2014 post titled "If You Let Them Build It, They Will Learn" helped me to visualize her space and understand her set up of fixed and flexible maker stations. Fleming has since written a book called Worlds of Making: Best Practices for Establishing a Makerspace for Your School and offers makerspace-focused PD. Other other ongoing virtual makerspace visits of mine have included:
Go to a Maker Faire As I was planning our makerspace in the winter of 2014, I got lucky. The first ever NoVa Mini Maker Faire (this faire has since lost its "mini"and is now officially called Maker Faire NoVa) took place just ten minutes from my house. My advice to you if you are thinking of developing a makerspace (or maker programming): get yourself to a Maker Faire. They are all over -- and undoubtedly, you will be able to find a Maker Faire held near you. Attending Maker Faire NoVA allowed me to explore all different kinds of making. I played with LittleBits and Squishy Circuits. I saw drones in action and discussed upcycling. I checked out robots, tinkered with a Makey Makey and watched earrings being made on a 3D printer. Most importantly, I was able to talk with everyone from student makers to educators to vendors, learning from their experiences and gathering ideas. 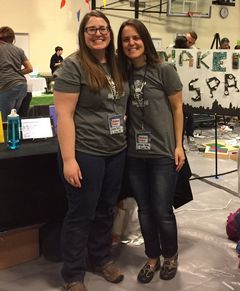 Susanna & I at Maker Faire NoVa. Photo by Valerie Jopeck. Susanna & I at Maker Faire NoVa. Photo by Valerie Jopeck. Find partners It's hard to go at any new initiative alone. In your makerspace effort, it's important for you to find partners and supporters in your local school community. As I was planning our space, I immediately reached out to friend and colleague, Brian Herberger. At the beginning of our makerspace journey, he was our School-Based Technology Specialist, a teaching position in charge of supporting technology in instruction. He was a obvious collaborator on our makerspace project, not only due to his technology skills, but also because Brian is a natural maker -- he builds things, crafts things, creates things. I, on the other hand, am not the kind of person who nails together a bookshelf or hems curtains; I am learning on this journey alongside my students. Brian has since moved into a district-level position, but is still invested in our space -- stopping by to visit, checking in with our projects on Twitter, and recently building us a table top loom. My current makerspace partner is my co-librarian. Susanna Carey. New to Kilmer this year, her energy and excitement has helped re-invigorate our makerspace program. Can you have two partners? Sure. Or three? Even better. But I believe that partnering with at least one other person will help you be more successful; a partner will provide a sounding board, share ideas and planning, and serve as another adult person in the space when you need it. Start small You can start a maker program in your school without any space or money. Even if you have space AND money, it might make sense to start small as you figure things out. You can begin maker efforts with a few bins of materials and some challenges or task cards to accompany those bins. My original plan was to use a large abandoned TV cart to house our maker supplies. It was going to be a mobile "makerspace."I think it's also important to start where you are comfortable. Are you interested in sewing? Woodworking? Crafting? Is coding your jam? Begin with something that is fun for you and share that with your students. Your makerspace efforts can easily grow from there. Involve your community Pulling together our makerspace would have been impossible without the support of our school community -- students, families, and staff. We received donations of old equipment for our students to take apart, LEGOs, Snap Circuits, PVC pipes, cardboard tubes, crafting supplies, storage bins, and more. A simple call out in our PTA newsletter brought in all sorts of things. If you don't have a school community who can support this effort, local craft stores, flower shops, electronics outlets, and hardware stores may all be willing to give you scraps to support your efforts. People want to help and love sending their donations to a place who will use them, appreciate them, and reimagine them. Donations of time are also incredibly meaningful. You may have a community member who can teach your students 3D design or bicycle maintenance. One mom recently spent hours in our space, sorting, organizing, and labeling all of our materials -- it was such a gift. And, perhaps most importantly your students have skills they would love to share with their peers -- putting kids in leadership roles allows them to really own their space.
You might also like:
0 Comments
Your comment will be posted after it is approved.
Leave a Reply. |
Who We Are

Join our list!Archives
September 2020
Categories
All
|


 RSS Feed
Proudly powered by Weebly